
How to find USB on MacBook
How to find USB on MacBook
Discover a comprehensive guide on locating and utilizing USB ports to connect devices, transfer data, and expand functionality on your MacBook for enhanced productivity.
Why are USB ports important on a MacBook and how do they help expand functionality?
USB ports on a MacBook hold immense significance as they serve as gateways to a world of expanded functionality and connectivity. These ports are crucial for seamlessly integrating a wide array of external devices into your MacBook ecosystem. Whether it’s transferring data, connecting peripherals, or expanding storage capacity, USB ports act as versatile conduits that enhance the overall user experience. One of the most common and valuable applications is the use of USB drives, also known as USB flash drives, which allow swift and convenient data transfer between devices. These drives become digital couriers, carrying files, documents, and media across systems with ease. Whether you’re sharing presentations, transporting important documents, or enjoying multimedia, the ability to connect a USB drive to your MacBook empowers you with portability and accessibility.
Moreover, USB ports play a pivotal role in expanding your MacBook’s functionality by enabling the connection of external storage devices. Whether it’s a high-capacity external hard drive or an SSD, these devices can be effortlessly connected via USB ports. This is particularly valuable when your MacBook’s onboard storage starts to fill up. By connecting an external drive, you can offload files, create backups, and organize your data more efficiently. The significance of USB ports extends to other external peripherals as well, including printers, scanners, digital cameras, and more. These ports foster a seamless integration of various devices, transforming your MacBook into a hub of productivity and creativity. Additionally, through the use of tools like the Disk Utility, users can format and manage external drives, making USB ports not just conduits, but gateways to a more organized digital life. In essence, USB ports on a MacBook are the embodiment of versatility, enabling you to tap into an ever-expanding universe of digital possibilities.
Discover the hidden treasure of USB ports on your MacBook!
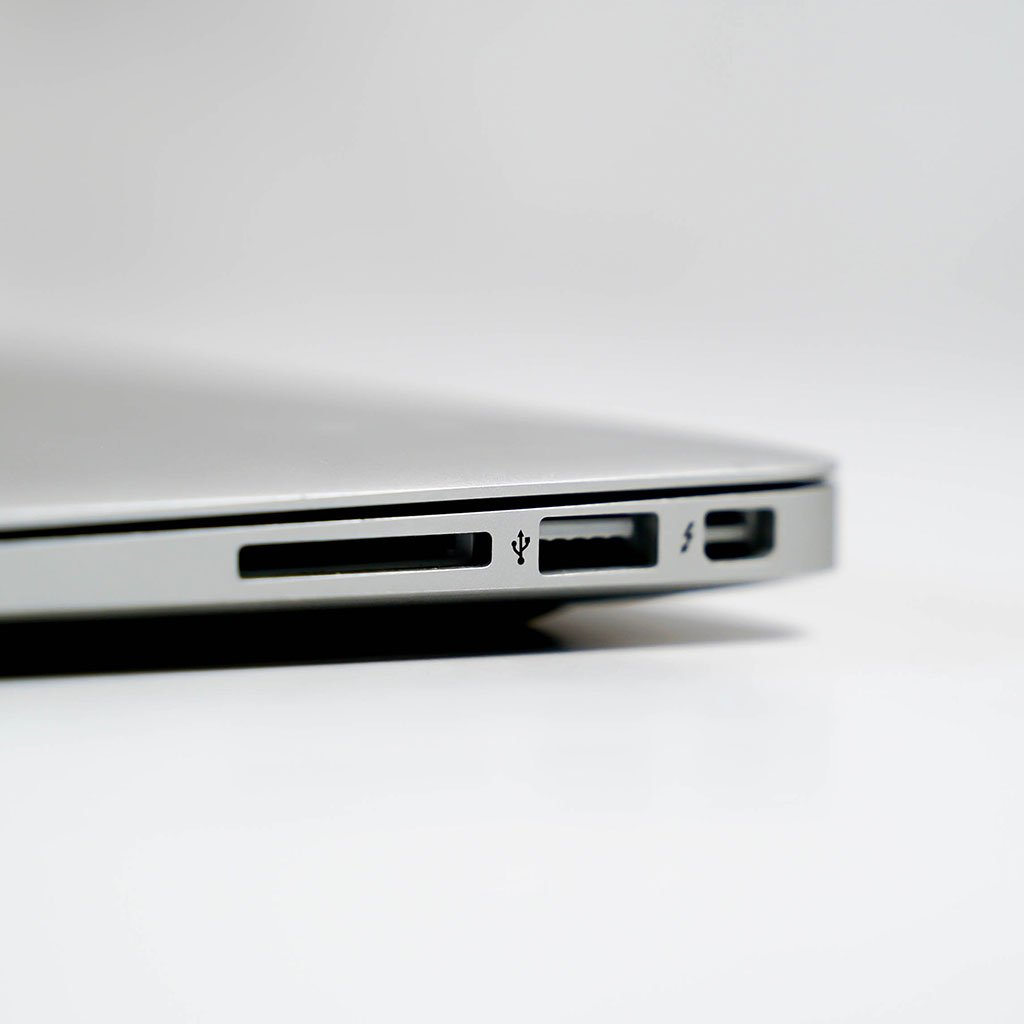
Locating USB ports on a MacBook is a straightforward process that allows you to connect a wide range of external devices, from flash drives to printers and more. These ports are essential for expanding your MacBook’s capabilities and transferring data between devices. Here’s a comprehensive guide on how to find USB ports on your MacBook and utilize them effectively:
1. Identifying USB Ports:
- USB-A Ports: Many older MacBook models feature traditional USB-A ports, which are rectangular in shape and commonly found on the sides of the MacBook. These ports are used for connecting various peripherals like external hard drives, printers, and USB flash drives.
- USB-C Ports: Modern MacBook models often come equipped with USB-C ports, which are smaller and reversible, allowing for easier insertion. USB-C ports offer versatility by supporting data transfer, charging, and video output. These ports are sometimes also called Thunderbolt 3 ports, as they are compatible with Thunderbolt devices.
2. Locating USB Ports:
- USB-A Ports: On older MacBook models, USB-A ports are usually found on the left or right side of the laptop. These ports might have the USB symbol engraved next to them.
- USB-C Ports: Newer MacBook models typically have USB-C ports on both sides. These ports are used for charging, data transfer, and connecting peripherals. USB-C ports may also double as Thunderbolt 3 ports, offering even faster data transfer speeds and compatibility with Thunderbolt devices.
3. Utilizing USB Ports:
- Connecting Devices: To connect a device, simply insert the USB cable into the corresponding USB port on your MacBook. The connector should fit snugly but not forceful. If the connector doesn’t go in smoothly, check the orientation; USB-C ports are reversible, so they can be inserted either way.
- Data Transfer: Once a device is connected, your MacBook will often recognize it automatically. For example, connecting a USB flash drive will display its contents in the Finder. You can then transfer files by dragging and dropping.
- Charging: USB-C ports on newer MacBooks can also be used for charging. You can charge your MacBook, connect external displays, and even power other devices using USB-C.
4. Expanding Functionality:
- Consider using a USB hub or docking station to expand the number of available USB ports. This can be particularly useful if you need to connect multiple devices simultaneously.
5. Ejecting Devices:
- Before disconnecting a USB device, make sure to eject it properly to prevent data loss. Right-click on the device’s icon on your desktop or in the Finder and select “Eject.”
By following these steps, you can confidently locate and utilize USB ports on your MacBook to connect devices, transfer data, and enhance your overall computing experience. Whether you’re backing up data, connecting peripherals, or expanding your MacBook’s functionality, USB ports are key to achieving seamless integration with a wide range of external devices.
How do USB-C ports on modern MacBooks handle data transfer, charging, and video output?
USB-C ports on modern MacBook models distinguish themselves with their compact and reversible design, revolutionizing the way we connect devices. Unlike their predecessors, USB-C ports are symmetrical, meaning the connector can be inserted either way, eliminating the need to ensure correct orientation. These ports offer a comprehensive solution for data transfer, charging, and video output, making them incredibly versatile hubs for expanding MacBook functionality. When it comes to data transfer, USB-C ports are designed for high-speed communication, allowing for swift file transfers between devices. This feature is particularly handy when using USB drives, such as USB flash drives, for sharing documents, media, or backups. The speed and efficiency of USB-C ports make them indispensable tools for streamlining workflows and enhancing productivity.
In addition to data transfer, USB-C ports also support charging capabilities, transforming them into power hubs. Not only can you charge your MacBook through these ports, but they also enable reverse charging, allowing your MacBook to power other compatible devices, like smartphones or accessories. Moreover, USB-C ports offer video output capabilities, turning your MacBook into a dynamic multimedia center. By connecting a USB-C to HDMI or DisplayPort adapter, you can use these ports to link your MacBook to external monitors, projectors, or TVs, creating a seamless extension of your display. This feature is particularly valuable for presentations, creative work, or simply enjoying media on a larger screen. The versatility of USB-C ports goes beyond mere connectivity; they are integral components that embody the future of device interconnectivity and provide users with a unified solution for data, power, and multimedia needs.
Properly ejecting USB devices before disconnecting them from a MacBook’s USB port is crucial to safeguard both your data and the health of the device itself. When you connect a USB drive, such as a USB flash drive or an external hard drive, to your MacBook, the operating system establishes a connection and interacts with the device’s file system. Ejecting the device through the appropriate method ensures that any ongoing read or write operations are completed, and the file system is properly closed. Abruptly removing a USB drive without proper ejection can interrupt these processes, leading to potential data corruption, file loss, or damage to the file system’s integrity.
Furthermore, ejecting USB devices through the proper method prevents the risk of hardware issues that could arise from improper removal. When you eject a USB device using the operating system’s commands or through tools like Disk Utility, the system notifies the device that it’s safe to disconnect. This allows the device’s internal components, such as the read/write heads of a hard drive, to safely return to their default positions. If you simply pull out the USB drive without ejecting it, these components might still be in motion, increasing the chances of physical damage and reducing the lifespan of the external storage device. By properly ejecting USB devices, you not only safeguard your data but also ensure the longevity and reliability of your external drives, minimizing the risk of potential hardware failures and complications arising from improper handling.
USB not detected on Mac
When it comes to using external storage devices such as USB drives, one of the most common problems encountered by Mac owners is when their USB drive isn’t showing up on their computer. This can be incredibly frustrating, as your files and data can’t be accessed if the device isn’t detected.
The reasons behind this issue can vary from user to user, but common reasons include wrong connections (i.e. not plugging the USB in fully), issues with the USB port itself (i.e. it needs cleaning) or that the connection requires too much power than what is available. For Apple computers older than 2018 models, they also often lack support for multiple power supply ports which may freeze the device upon plugging in two or more at once.
In any case, the first order of business should be ensuring that the USB connection is securely placed into a functioning port; then to check and see if your computer has an outdated version of its operating system, drivers or firmware that must be updated in order for proper functionality with external media; When trying to troubleshoot why your USB device is not being detected on your Macbook, it’s important to make sure the settings are correct. One way to do this is by resetting both the PRAM (Parameter RAM) and SMC (System Management Controller) settings.
Conclusion
In conclusion, connecting and disconnecting USB devices on a MacBook should always be done properly in order to avoid potential data loss or hardware damage. To find your USB ports on a MacBook, simply locate the small rectangular ports located along the side of your laptop. These are usually labeled with an “USB” logo, making them easy to identify. Once you have located your USB-C ports, you can proceed to connect and eject compatible USB devices as needed.

Copyright © OurDeal. All right reserved.

You must be logged in to post a comment.